自 Apple 公司在自主研發處理器上取得成功後,各家媒體多將焦點放在卓越的媒體製作效能,以及不同情境下,處理器的效能檢測結果,卻忽略了 Apple 處理器上特別的 16 核心神經網路引擎(Neural Engine)。對 AI 工程師來說,不免好奇神經網路引擎是否能帶給大家不同的體驗以及使用方式。因此,本文將與大家分享 python 調用 Neural Engine 的方法,從 Neural Engine 執行結果所花費的時間來看,速度加速非常顯著。
一、任務說明
這次的任務為 400 種鳥類的分類問題,從訓練到推論皆使用搭載 M1 晶片的 Macbook Air 完成,最後部署在 iPhone 上,實現 Apple 一條龍的實驗。這次的 AI 模型開發工具為 PyTorch Lightning,這是一個基於 PyTorch 的開發工具,並整合了工程師們開發模型時會使用到的函式,協助工程師們更便利與快速地開發,文末附有github連結,以下範例皆以 GitHub 內容為主。
最後提醒,以往 AI 開發工具皆利用 Nvidia 的顯示卡進行設計與開發,但是 Apple 處理器為 ARM 架構,這與以往差異盛巨大,因此,在一些原本可以運作的開發工具功能上,在適配上還沒有到位。隨著 ARM 晶片越來越主流,相信這部分的相關功能也會越來越完善。
本次使用設備:
- Mac Air M1 : CPU 8 核心、GPU 8 核心、Neural Engine 16 核心、16g RAM
- iPhone12 : CPU 6 核心、GPU 4 核心、Neural Engine 16 核心、4g RAM
二、環境配置
開啟終端機,並輸入以下指令
Install Xcode
xcode-select --install
Setting Python Environment
-
Install Homebrew
在終端機輸入以下指令
/bin/bash -c "$(curl -fsSL [https://raw.githubusercontent.com/Homebrew/install/HEAD/install.sh](https://raw.githubusercontent.com/Homebrew/install/HEAD/install.sh))" -
Install miniforge
brew install miniforge*如果遇到 “command not found: brew” 錯誤訊息時,請輸入以下指令
export PATH=/opt/homebrew/bin:$PATH
Conda environment
-
新增環境
conda create -n torch python=3.10 -
啟動環境
conda activate torch-gpu -
結束環境(當不使用環境時可以輸入以下指令)
conda deactivate
Install PyTorch, PyTorch-Lightning and coremltools
-
PyTorch
pip install torch torchvision torchaudio -
Pytorch-Lightning
conda install pytorch-lightning -c conda-forge -
coremltools
pip install coremltools -
other tool
conda install -c conda-forge opencv pip install pandas pip install tensorboard -
test(請在終端機輸入 “python”)
import torch
import pytorch_lightning as pl
import coremltools as ct
print(torch.backends.mps.is_available())# true
print(torch.backends.mps.is_built()) # true
三、資料集準備與說明
400 種鳥類資料集,訓練資料集共有 58388 張圖片,驗證資料與測試資料集分別有 2000 張圖片,所有圖片尺寸皆為 (224, 244, 3) 的彩色圖片。
詳細資料說明與資料下載請至以下連結:
[https://www.kaggle.com/datasets/gpiosenka/100-bird-species](https://www.notion.so/https-www-kaggle-com-datasets-gpiosenka-100-bird-species-8b505698405c48c9ad7ab73a705742a3)


四、訓練流程
LightningDataModule
class DataModule(pl.LightningDataModule):
    def __init__(self, batch_size, datadf):
        super().__init__()
        self.batch_size = batch_size

        self.trainDataset = ImageDataset(datadf, 'train')
        self.validDataset = ImageDataset(datadf, 'valid')

    def train_dataloader(self):
        return DataLoader(self.trainDataset, batch_size=self.batch_size, drop_last=True, shuffle=True)

    def val_dataloader(self):
        return DataLoader(self.validDataset, batch_size=self.batch_size)
class ImageDataset(Dataset):
    def __init__(self, data_df, key):
        super().__init__()
        self.img_path_List = []
        self.labelList = []
        data_df = data_df[data_df['data set'] == key]
        for idx in data_df.index:
            self.img_path_List.append(
                'data/bird_data/' + data_df.at[idx, 'filepaths'])
            self.labelList.append(int(data_df.at[idx, 'class index']))

		def __getitem__(self, index):
        img = PIL.Image.open(self.img_path_List[index])
        img = img.resize([112, 112], PIL.Image.ANTIALIAS)
        img = np.asarray(img).astype(np.float32)
        img = img / 255
        imgTensor = torch.from_numpy(img.transpose((2, 0, 1)))
        return imgTensor, self.labelList[index]

    def __len__(self):
        return len(self.labelList)
結合 pytorch dataset、dataloader 的功能,也將 train、validation、test 三種dataloader整合進這個 Module 中。
-
class ImageDataset 解說
在初始化階段,讀取 Kaggle 下載的資料集中,birds.csv,csv中有4個欄位,主要是收集 filepaths 與 class_index 後續進行讀圖與訓練準備。
- class_index : 紀錄圖片的標籤,最小 0,最大 399,共 400 類
- filepaths : 紀錄圖片相對路徑
- labels : 紀錄圖片標籤名
- data set : 該張圖片屬於 train、validation、test 哪一種
在訓練階段,ImageDataset 已經透過 dataloader 轉為迭代器,在__getitem__被呼叫的過程才進行 PIL 開圖的動作。
-
dataloader 解說
dataloader 決定 batchsize 大小,資料訓練時是否shuffle
LightningModule
class Model(pl.LightningModule):
    def __init__(self, class_num):
        super().__init__()
        self.save_hyperparameters()
        self.model = models.resnet18(pretrained=True)
        num_ftrs = self.model.fc.in_features
        self.model.fc = nn.Linear(num_ftrs, class_num)
        self.train_loss = nn.CrossEntropyLoss()
        self.train_acc = Accuracy()
        self.val_loss = nn.CrossEntropyLoss()
        self.val_acc = Accuracy()

    def forward(self, x):
        return self.model(x)

    def training_step(self, batch, batch_idx):
        img, label = batch
        out = self(img)
        _, pred = out.max(1)
        loss = self.train_loss(out, label)
        acc = self.train_acc(pred, label)
        self.log_dict({'train_loss': loss, 'train_acc': acc}, prog_bar=True)
        return loss

    def validation_step(self, batch, batch_idx):
        img, label = batch
        out = self(img)
        _, pred = out.max(1)
        loss = self.val_loss(out, label)
        acc = self.val_acc(pred, label)
        self.log_dict({'val_loss': loss, 'val_acc': acc})

    def configure_optimizers(self):
        optimizer = torch.optim.Adam(self.parameters(), lr=0.0001)
        lr_scheduler = torch.optim.lr_scheduler.ReduceLROnPlateau(
            optimizer)
        return {"optimizer": optimizer, "scheduler": lr_scheduler}
結合模型建立(使用pre-trained model)、損失函數定義、評估指標與整個訓練流程。
-
初始化階段定義模型,因為使用 pre-trained model 所以要記得修改最後一層的神經元數量,修改成 400 (此資料集總類別數)。
-
forward 定義模型如何向前傳播。
-
training_step 定義整個訓練過程需要完成的步驟。
a. 取得batch 、b. 向前傳播( forward() )、c. 計算 Loss
-
configure_optimizers 定義 optimizer 以及 learning rate scheduler。
-
如果有資料想要隨著訓練過程持續被紀錄,要使用 self.log_dict,以 key、value的結構紀錄
可以使用 tensorboard 進行監控
Trainer
epochs = 10
checkpoint_callback = ModelCheckpoint(
        dirpath="best_model",
        save_top_k=1,
        filename="birds-{epoch:02d}-{val_loss:.2f}.ckpt",
        monitor="val_loss")

trainer = pl.Trainer(
        max_epochs=epochs,
        accelerator='auto',
        devices=1,
        logger=True,
        callbacks=[checkpoint_callback]
    )
定義訓練時的參數,訓練多少 epoch、使用何種 device、需不需要紀錄 log ,最後使用 fit 進行訓練,fit 需要傳入兩參數 1. LightningModule 的 class 物件 、2. LightningDataModule 的 class 物件。
*可以在callbacks 使用 pruning 對模型剪枝,但目前 Mac GPU在使用上有些限制
(可以參考這裡討論)
Currently topk on mps works only for k<=16
因此在 pruning amount 參數必須小於等於16
五、模型轉換
model = Model.load_from_checkpoint("Path")
X = torch.rand(1, 3, 112, 112)

image_input = ct.ImageType(name="input_1",
                           shape=X.shape,
                           scale=1/255.0)

model.to_torchscript(file_path="best_model/model_trace.pt", method='trace',
                     example_inputs=X)

traced_model = torch.jit.trace(torch.load('best_model/model_trace.pt'), X)

model = ct.convert(
    traced_model,
    inputs=[image_input],
    classifier_config=ct.ClassifierConfig('data/bird_data/labelname.txt'),
    compute_units=ct.ComputeUnit.ALL,
)
model.save("best_model/bird.mlmodel")
接下來要使用 coremltools 進行模型預測,所以需要將訓練好的模型,轉換成 coremltools 模型,PyTorch 模型路徑需要修改。
- 使用 coremltools 中的 convert 進行轉換,其中 PyTorch 必須為 traced model ,因此需要使用torch.jit.trace() 轉換訓練好的模型,再輸入至 coremltools。
- 使用 coremltools 進行轉換模型時,要注意參數 compute_units 計算方式設定,詳細參數如下,本次範例使用 ALL 參數。
- 本次範例是圖片分類任務,輸入是圖片矩陣,所以在使用 coremltools ,inputs 參數要給ct.ImageType 的格式。
ALL = 1  # Allows the model to use all compute units available, including the neural engine
CPU_AND_GPU = 2 # Allows the model to use both the CPU and GPU, but not the neural engine
CPU_ONLY = 3 # Limit the model to only use the CPU
CPU_AND_NE = 4 # Allows the model to use both the CPU and neural engine, but not the GPU.
               # Only available on macOS >= 13.0
六、inference on Mac
model = ct.models.MLModel('best_model/bird.mlmodel')
bird_data = pd.read_csv('data/bird_data/birds.csv')
bird_data = bird_data[bird_data['data set'] == 'test']

for idx in bird_data.index:
    img_path = "data/bird_data/" + bird_data.at[idx, 'filepaths']
    img = PIL.Image.open(img_path)
    img = img.resize([112, 112], PIL.Image.ANTIALIAS)
    coreml_out_dict = model.predict({"input_1": img})
    print("top class label: ", coreml_out_dict["classLabel"])
接下來的目標是,如何利用 Apple 的神經網路引擎( neural engine ),加速模型運算的效率,這方面 coremltools 有這方面的支援,所以需要說明的是如何使用 coremltools。
-
載入上面步驟轉換好的模型,通常會在主程式執行前,預先載入,後續只負責預測。
-
讀取圖片,這次範例是使用測試資料集,並以 dictionary的格式輸入進模型,key 為當初模型轉換時設定,value 為圖片,進行預測,從結果觀察一張 (112, 112, 3) 的彩色圖片只花費0.00087秒的時間。
*如果使用 PyTorch 進行預測任務(inference_pt.py),圖片讀取完後需要做以下幾個步驟:
- 將圖片矩陣轉換為 torch tensor,並新增一個維度(batch),(1, 112, 112, 3)。
- 圖片正規化,以此範例是除 255。
- pytorch 是 channel first ,所以需要將色彩通道(channel)往前搬移,
e.g. ( 1, 112, 112, 3 ) → ( 1, 3, 112, 112 )
-
coremltools 模型輸出為一個 dictionary ,key 為當初模型轉換時設定(沒有設定的話coremltools 會自己指定,value為預測結果
-
接下來比較 pytorch cpu、gpu、Neural Engine 在測試資料集(2000張)上進行預測的時長比較,Neural Engine 快於 gpu 8倍, gpu 快於 cpu 6.7倍,Neural Engine 快於 cpu 54倍。
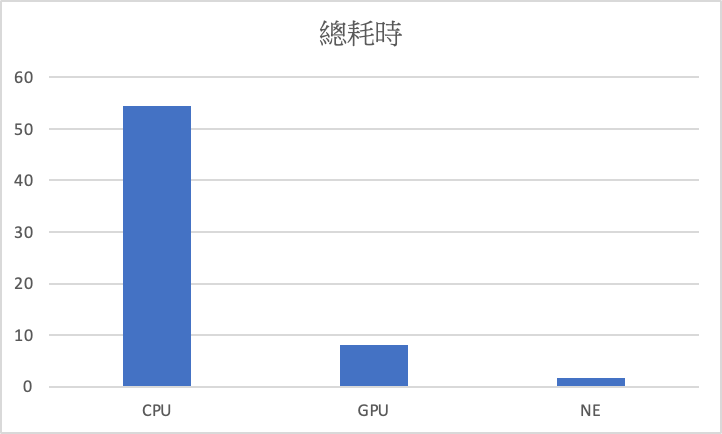
cpu : 54.39秒,gpu : 8.13秒,NE : 1.75秒
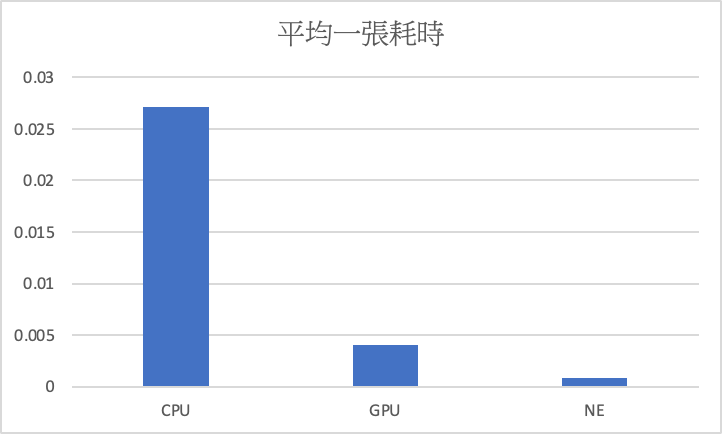
cpu : 0.027秒,gpu : 0.00406秒,NE : 0.00087秒
七、inference on iPhone - CoreMLDemo
-
使用 Xcode 進行app開發,需要將轉換好的模型複製進 /CoreMLDemo/CoreMLDemo 資料夾中。
-
需要注意 ios 版本設定
@available (iOS 13.0, *) ... override func viewWillAppear(_ animated: Bool) { if #available(iOS 13.0, *) { model = bird() } else { // Fallback on earlier versions } } -
注意模型命名修改
var model: bird! ... model = bird() -
注意圖片尺寸修改
112*112 是範例訓練尺寸
UIGraphicsBeginImageContextWithOptions(CGSize(width: 112, height: 112), **true**, 2.0) image.draw(in: CGRect(x: 0, y: 0, width: 112, height: 112)) -
模型輸入名稱修改
- input_1 為當初 pytorch 模型轉換是設定(pt2ct.py)
guard let prediction = try? model.prediction(input_1: pixelBuffer!) else {
return
}
Iphone 呈現結果
總結
本篇文章分享了從環境建置到部署於手機端的圖片分類任務,以日漸主流的 PyTorch 做為 AI 模型的核心設計與訓練流程,最後因應不同的開發工具,將 PyTorch 模型轉換為 coreml 模型,實現在Apple 神經網路引擎進行加速運算。
隨著 AI 越來越蓬勃發展,不只 Apple 公司,各家廠商都推出自己的神經網路引擎,可以看到神經網路引擎能帶來十分顯著的速度提升,且在手機端的執行速度也有不錯成效。
參考文獻
- https://towardsdatascience.com/installing-pytorch-on-apple-m1-chip-with-gpu-acceleration-3351dc44d67c
- https://towardsdatascience.com/how-to-easily-set-up-python-on-any-m1-mac-5ea885b73fab
- https://coremltools.readme.io/docs/convert-a-torchvision-model-from-pytorch
- https://tugot17.github.io/data-science-blog/onnx/tutorial/2020/09/21/Exporting-lightning-model-to-onnx.html
- https://www.appcoda.com.tw/core-ml-tools-conversion/
Github
[git@github.com:GuffreyKu/pytorch.git](https://www.notion.so/git-github-com-GuffreyKu-pytorch-git-5694053be2f04858a0fc8ac4f654b5ab)
(撰稿工程師:顧祥龍)